Garden Pizza, Gluten Free Crust, and Pizza Day Giveaway

finished sauce with tomato2 copy

In my newest book, Pizza Day, which will be released by my publisher Tuesday, there is a pizza recipe at the end of the story called Garden Pizza.

To win a signed and personalized copy of Pizza Day and its the companion, Soup Day, please go here!

Pizza Day and Soup Day Melissa Iwai 2017-72

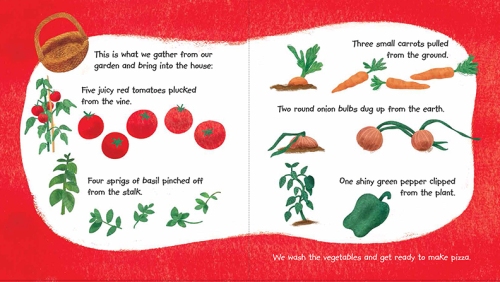
Garden Pizza is what a little boy and his dad spend the day making using some of the ingredients that they have grown in their garden.

pizzaday_int_garden-Melissa-Iwai

These are some of the vegetables that they gather:

Pizza-Day_int-10-11-Melissa-Iwai

Sadly, we don’t have a stellar garden like theirs, so I made this pizza the other night for my guys using ingredients I bought instead.

Sauce igredients4 copy

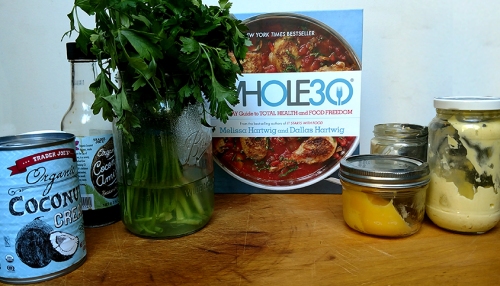
Some of my sauce ingredients: diced carrots and onion, dried oregano and basil, garlic, tomato, and olive oil (I forgot to include the tomato paste here!). I use the fresh basil as a garnish to top the pizza when it’s done.

First I made the dough and let it rest and rise while I cooked the sauce.

dough pre rise 2 copy

My sauce gets its sweetness from the carrots. No sugar needed! Plus the carrots add nutrients and fiber.

pizza sauce

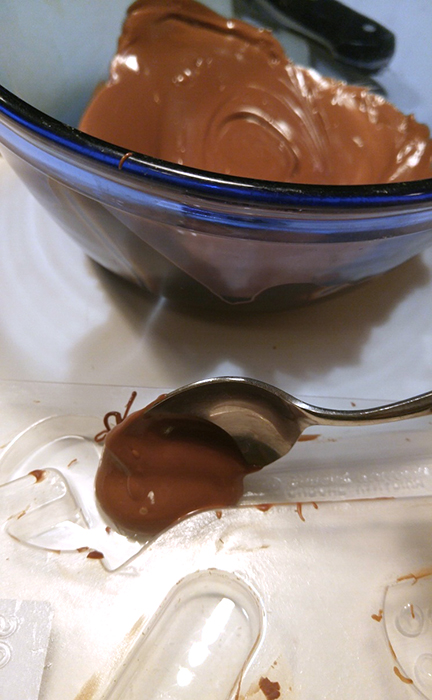
After the sauce cooked down and the flavors melded together, I pureed it in a blender, just like the boy in my book!

Pizza-Day_int-20-21-Melissa-Iwai-2017

Then when the dough was finished, I kneaded it, let it rest a bit, and rolled it out.

rolled out dough copy

It was time to top! Denis and Jamie just wanted sauce and cheese.

cheese pizza PIzza Day by Melissa Iwai 2017

I made mine veggie and turkey and used a cauliflower crust I had made (see recipe below), because I was doing reintroductions after the Whole 30 and hadn’t gotten to gluten yet!

PIzza Day by Melissa Iwai 2017

Riced cauliflower with egg and almond meal prebaked

PIzza Day by Melissa Iwai 2017

Baked crust (you must bake it before topping)

veggie pizza PIzza Day by Melissa Iwai 2017

Topped with pepper, tomato, onion, sauteed kale, and turkey

Then into the oven our pizzas went.

The final product:

finished pizza 3 copy

Crispy on the outside, chewy crust


vegie pizza closeup PIzza Day by Melissa Iwai 2017

My mini pizza with veggies, turkey, mozzarella, and fresh basil

Pizza Day by Melissa Iwai 2017
Cheesy!

Don’t forget to enter for a chance to win a signed copy of Pizza Day and the board book version of Soup Day here!

Pizza-Day_int-30-31-Melissa-Iwai-2017


Garden Pizza from Pizza Day by Melissa Iwai

Pizza Dough:

Ingredients:

Non-stick spray or oil for greasing

1 ½ teaspoons active dry yeast

1 cup warm water

2 tablespoons olive oil

1 ½ teaspoons kosher salt

3 cups flour, divided, plus more if needed

non-stick spray


Pizza Sauce:

1 tablespoon olive oil

½ cup chopped onion

¼ chopped carrot

1 ½ tablespoons chopped garlic, about 2 cloves

½ teaspoon kosher salt

1 teaspoon dried oregano

1 teaspoon dried basil

2 ½ cups chopped vine-ripened tomatoes, about 3 large

¼ cup tomato paste

  1. Spray a large bowl with non-stick spray. Set aside.
  2. Whisk together yeast, water, olive oil, and salt in another large bowl until combined. Let sit for about 5 minutes.
  3. Add 2 cups of the flour to mixture and mix together until well blended.
  4. Add a little bit of the leftover flour gradually (you may use half or all) until dough forms a ball.
  5. Sprinkle flour onto a large board or counter top, and dump out dough. Knead for 5 minutes, adding a bit of the remaining flour each time it starts to feel sticky. You want to end up with a smooth, elastic mound of dough.
  6. Shape dough into a large ball. Place in greased bowl and turn over to coat with oil. Cover with a damp cloth and let rest for 1 hour.
  7. Heat olive oil in skillet and saute onions, carrots, garlic, salt, and herbs until onion is translucent.
  8. Add tomatoes and paste. Simmer until softened on very low heat, covered, about 20-30 minutes. Stir occasionally.
  9. Pulse in blender or food processor to desired chunkiness.

To assemble:

Preheat oven to 450 degrees F for 10 minutes.

  1. Divide pizza dough in half, and roll each into a ball. Let rest 10-15 minutes.
  2. Lightly dust two baking sheets and a rolling pin with flour. Roll out each ball of dough into a round on each baking sheet.
  3. Spoon pizza sauce on top and spread onto each. Top with fresh veggies, pepperoni, cooked sausage, shredded cheese, grated parmesan cheese, goat cheese, whatever you like!
  4. Bake for 10-13 minutes, depending how crunchy you like your crust.

Makes 2 medium pizzas.

Gluten Free Cauliflower Pizza Crust

Nonstick olive oil spray

1 1/2 cups of riced cauliflower (I buy mine bagged from Trader Joe’s. You can also make your own by ricing or grating raw cauliflower), steamed for about two minutes

1 egg white or 1/2 whole egg

1 tablespoon almond meal

  1. Preheat oven to 400 degrees F.
  2. Prepare  two square pieces of parchment, about 6″ x 6″. Place one square on baking sheet and spray with non stick spray; set aside.
  3. Mix rest of ingredients together in a bowl.
  4. Spoon mixture on top of prepared parchment sheet on baking tray. Flatten into a circle with a spoon.
  5. Bake for about 15 minutes.
  6. Remove from oven. Place other square of parchment on top of crust and flip. Then peel cooked piece of paper off.
  7. Your crust is now ready to be topped with toppings of your choice. After topping, bake in oven for another 5 minutes.

Makes one mini pizza crust.


5 Comments

Filed under Art Related, Books, Children, Dinner, Gluten Free, Vegetables, Vegetarian

Whole 30

whole 30 sm

Discovered Coconut Cream, Coconut Aminos and using more fresh herbs and homemade condiments

I’ve been aware of the Whole30 program for several years but was never interested in doing it, because it sounded so intense. In a nutshell, if you aren’t familiar with it, the founders, Melissa and Dallas Hartwig call it a “reset”, not a diet. The Whole30 focuses on changing lifestyle habits related to food, by means of eating whole foods only and eliminating all foods that could be contributing to compromising one’s total health. Basically, they argue that you should eliminate these foods for a minimum of 30 days to see if there is a change in your health. Then you gradually reintroduce those foods back into your diet, paying close attention to how they affect you physically or emotionally. The foods in question are: Sugar, alcohol, soy products, legumes, dairy, and some additives, such as sulfites. Also, they want you to avoid baked goods, junk food or treats made with “approved” ingredients (this was the hardest for me!) More detailed information and the arguments in favor of trying such an elimination process can be found here. There is tons of information on the website.

This post is just my experience with it. I think it is different for everyone. I like that it its heart, it focuses on the individual and doing a “science” experiment on yourself to see what foods make you feel good and which don’t.

A lot of people lose a ton of weight. Jamie’s squash coach lost 30 pounds in the summer. I, on the other hand, lost a negligible 2 pounds. Since our weight can fluctuate a lot even during the day, this isn’t saying much. I did lose a lot of bloat though. But, the Whole 30 is explicitly NOT a weight loss plan, and they encourage you to not weigh yourself or track that kind of thing, because the focus is on the food and nutrition and overall health. Another term they use for this is “non-scale victories”, of which, I’m happy to say I had quite a few.

Some of these include: Sleeping way better every night; having more energy without caffeine during the day (it is not required, but I cut out all forms of caffeine while doing the Whole30, including cacao powder and black tea!); ending my sugar, chocolate, peanut butter addiction, reducing the general aches and pains I had all over my body (arm, back, shoulder); surprisingly, a new appreciation for cooking and trying new ingredients and vegetables. I already enjoy cooking, but it took it to a whole new level for me! I cooked every single meal except for one the whole month, and I actually LOVED it. I started using way more fresh herbs and now must have a variety at all times. I started browsing the produce aisle with renewed curiosity and marveling at the beauty inherent in fresh vegetables and fruit.

shopping cart

My shopping cart at Trader Joe’s these days is heavy on the produce.

So I definitely count those as wins. And the one reason why I decided to tackle the Whole30 was to “healthify” my life! After my hellish year dealing with injury after injury and dental issues, all stemming from stress and over working (written about in more depth here), I made a commitment to make adjustments in my lifestyle across the board. arm 72

During this process, I realized that the only time I had made a concentrated effort to take care and truly nourish my body in my adult life was when I was pregnant with my son 14 years ago! I took a tally of all the injuries I have sustained since having him: Broken foot, two sprained ankles, sprained thumb, frozen shoulder, chronic back pain, torn elbow tendon, torn hamstring tendon, tendonitis in knee, all due to over training and probably not eating well. Kind of crazy. When I started cooking all my meals and being so careful about my ingredients (sugar is in everything, people – I’m looking at you Sriacha), it reminded me of how careful I was when I had pre-gestational diabetes during my second and third trimesters. It is such a nice feeling to feed myself with the focus of nourishing my body and making it feel good, rather than other reasons (oh that’s fattening, or oh, that food reminds me of x,y,z), mostly mental/emotional or just removed, and going through the motions.

typical breakfast now

Typical breakfast these days: Lots of vegetables (roast yam, steamed zucchini, mushrooms), protein (eggs), healthy fats (avocado), condiments (homemade ketchup), fresh herbs (chives)

I think that the Whole30 is not for everyone. Denis was NOT going to do it, and that is fine. I think it would be really hard and feel restrictive if you weren’t coming from a place where you believed that changing your eating habits would improve your life. It would just feel like a bunch of rules that you’d be dying to break.

Now, I’m slowly reintroducing foods. So far I’ve learned that dairy is not so great, especially cheese. I already knew I was lactose intolerant, so this is not surprise. I occasionally eat Greek yogurt and that seems OK. I still avoid caffeine and sugar, though I’ve had a little bit of the latter in cough drops and some honey. Legumes are fine. Bread is fine, but I don’t really care for it. I really missed rice though. And some soy, just because it is more convenient (soy is also in everything! Even as another ingredient in some of my vitamins). I figure being ethnically Japanese, soy is fine. Surprisingly, I haven’t had a drop of alcohol, and I totally don’t miss it. I was aware before that it was messing with my body as I get older anyway.

I still have a sweet tooth, so that’s annoying. But plain fruit tastes so sweet to me now, that’s all I eat. Even some vegetables like sweet potato and delicata squash taste like dessert to me now.

delicata squash

Delicata, my new obsession. Someone on Instagram said it’s like “butternut squash’s hot older brother”. I wish I could remember who it was so I could credit her!


The seeds are also great!

delicata seedsjpg

Toss in or spray with olive oil, roast at 400 F for about 10 minutes.

Some tips for food prep if you decide to do the Whole30:

  • Have a lot of prepped foods in the refrigerator so you don’t have to think when pulling together a meal – I like to always have roasted vegetables, steamed vegetables, sauteed vegetables, different forms of protein (eggs, sauteed, grilled, and roasted meats), lots of condiments and fresh herbs


  • You can make a bunch of condiments at once, like on a weekend. Then you have it all week or longer. My favorites are: clarified butter, flavored butter, pesto, homemade ketchup, homemade mayo, Sunshine sauce (see recipe below), guacamole, salsa, tomato sauce, fresh squeezed lemon and lime juice with kosher salt.


  • Make the slow cooker your new best friend. It’s so easy to cook a lot of meat and vegetables and stews and curries for leftovers. Even though Jamie and Denis weren’t doing the Whole30, I was able to make meals for all of us, and just swap out rice, bread, pasta, cheese, with more vegetables on the side.


  • Easiest, no thinking required meals were: Salads and hot bowls made out of the above items – a palm size of protein, a thumb size of healthy fats, a ton of vegetables

Things I would do differently would be to limit my nut, dried fruit, and seed consumption. It is so easy to overdo it! Also I would try to keep a better record of how I was feeling physically during the month. It is so easy to forget after a week. When I read how I was feeling the first day (in pain) and how I was feeling the last week (pretty great), it is pretty cool to see it in writing. Also, I had blood work done near the end, and my blood sugar levels were lower than last year, and everything was really good. 🙂

Would you ever try the Whole30? Have you already done it? If so, what were the best things for you? And what would you do differently if you did it again? Leave a comment below. I’d love to hear about your experiences!

I was enjoying plating my new kinds of foods so much, I started another Instagram account here: https://www.instagram.com/healthywholefooddaily/

Some recipes I adapted based on Whole30 recipes:

Ketchup

1/2 cup tomato paste

2 tablespoons unsweetened applesauce

1/4 cup cider vinegar

1/2 teaspoon garlic powder

1/4 teaspoon salt

  1. Mix together.

Note, the Whole 30 version uses cider and the mixture is cooked. I found I liked it raw, and I couldn’t find apple cider that didn’t cost an arm and a leg just for ketchup.

Sunshine Sauce (adapted from Melissa Joulwan)

1/2 cup tahini

1/2 cup coconut milk

juice of 1/2 lime

1 tablespoon coconut aminos

1 clove of garlic, finely minced

1/2 teaspoon apple cider vinegar

  1. Mix together.

This sauce is SOOO good with raw vegetables, or thinned with more coconut milk and drizzled over roasted vegetables or salad.


8 Comments

Filed under Books, Condiments

Matcha Pudding

matcha-pudding-Melissa-Iwai-2017

Recently, we received lovely birthday cards from my friend, Tomoko, who lives in Japan. I met her at the Prefectural Offices of Iwate where I used to work when I was in the JET Program from 1989-1991!

Since 1987, the JET Program has sent over 60,000 people from different countries to work in Japan (mainly as teachers). I’m so happy for and proud of my nephew, Nick, who recently was accepted into the program and will be teaching English in Kyoto starting this fall! I made so many lifelong friends during my experience there, as I’m sure he will! For more information on JET, click here.

In her card, Tomoko mentioned that she hadn’t seen me for awhile here, and she was worried! (I’m sorry, Tomoko!) As some of you may know, I’ve been dealing with an arm injury from last fall. I’m almost back to normal, but I’m so behind in work, I’m just trying to catch up and keep afloat! I recently wrote a long post on my website about how I tore my elbow tendons and what I’m doing to heal…

Long story short, for months, I couldn’t do much with my right hand, including work. But it was difficult to do basic things like open doors, and type, and use my phone. The camera I use for this cooking blog is a large Canon with a flash, and I wasn’t able to use it without stressing my arm. (The last post I did, I used photos taken with my phone, but they aren’t that great…!) Thus, the extended hiatus…

My son is now on summer break, and one of our at-home projects is for him to learn the Japanese syllabary (hiragana and katakana) and some Kanji by the time he starts his first Japanese class in the fall. Right now, we are just working on recognition and pronunciation. Later we’ll focus on writing. I’m also teaching him some simple Japanese using Japanese children’s books (they are so great because they are written in all hiragana, using simple vocabulary!) And we are enjoying this cool series on Netflix, called Japanese Style Originator, which we love!! It’s all about food, culture, and craftsmanship in Japan. Recently we saw a dessert in an episode about sushi that inspired him to request that we make Matcha Pudding together.

I found a great recipe for a gelatin based one at washoku.guide which will, unfortunately be taken down on the 29th! I was so sad to discover this site right as it’s about to disappear forever. There are so many wonderful Japanese recipes there! Go visit if you can before the 29th!

To make this easy pudding, all you do is dissolve 5 g of unflavored gelatin in water. Heat the milk in the microwave. Then add matcha powder and sugar and the gelatin and stir until dissolved.  Pour into dishes and chill.

The next time we make this, I will instead dissolve the sifted matcha powder in a bit of hot milk first. Then when it is completely dissolved, I will mix it with the rest of the milk. We were in such a hurry this time, we dumped everything in all at once, and it was a bit clumpy.

This is what it looks like after chilling:

matcha-in-ramekin-Melissa-Iwai2017

I traced the edges with a sharp knife and then set the ramekin of pudding in a bowl of steaming hot water for about 15 seconds. Then I covered it with a dish and turned over to remove and invert the jiggly mass of goodness.

matcha-pudding-2

Our pudding doesn’t have a smooth jade-like top because we didn’t mix the matcha well enough. But it was still soooooo good! I used Jade Leaf Matcha, and the flavor was exquisite. If you love matcha as we do, you will love this easy pudding!

Matcha Pudding (From washoku.guide with some alterations):

5 g unflavored gelatin

2 tablespoons water

300 ml milk

1-2 tablespoon matcha powder

50g sugar


  1. Dissolve gelatin in a small dish with the water.
  2. Heat the milk in the microwave for about two minutes.
  3. Sift the matcha into another small dish. Add about a tablespoon of the hot milk into the matcha, whisking continuously until completely dissolved. Then add this mixture to the rest of the milk.
  4. Add the sugar and stir until dissolved.
  5. Transfer mixture to three small ramekins. Chill overnight until firm.
  6. To serve, run a sharp knife around edge of pudding to loosen. Set ramekin in a larger bowl of very hot water for about 15 seconds. Then cover with a serving dish and invert pudding on top of it.

Makes three servings.

emptymatcha

After inverting…. 


6 Comments

Filed under Desserts, Uncategorized

High Protein Matcha Latte

macha-with-brushSome time at the end of last year, I started drinking more tea in place of coffee. Don’t get me wrong – I LOVE coffee. But unfortunately, coffee doesn’t always love me. As I grow older I find that my body isn’t metabolizing it as efficiently as it used to. This led me to the auspicious discovery of matcha – green tea leaf powder. Many years ago, I had ceremonial matcha in Japan at a couple of tea ceremonies, and I remember it being very bitter and strong. We sipped it while nibbling on sweet yokan (a Japanese sweet bean based dessert).

Last fall, during my coffee abstinence period, I wanted a caffeine boost via tea, and I tried a Green Tea Latte at Starbucks. I became addicted. Since then, I’ve been experimenting with matcha and trying to make my own lattes at home. It is too much of a luxury to pay over $4.00 for a daily drink, and I learned that the Starbucks’ version has 25 grams of sugar in a tall size!!

Matcha is considered to be a super food for its exceptionally high content of antioxidants. It is widely known for as a unique aid in staying alert and focused without the jitteriness that sometimes accompanies drinking strong coffee (or for me, coffee in general). This is because though it contains caffeine, matcha also contains amino acids including, L-Theanin, which slows the release of the caffeine.

I still love the flavor of coffee, and I will sometimes “indulge” in a decaf, but for my daily morning fix, I have been drinking my High Protein Matcha Latte. I bought a cute little milk frother on amazon, and that has changed my life for the better as well!

spoon-foam

First I mix unsweetened coconut milk with vanilla protein powder. I use Optimum Nutrition Vanilla Creme whey protein. You could just skip this part if you don’t like powders and sweeten your drink with something else. I heat the mixture briefly and froth it up with my frother. Look how wonderfully it does its job!

Then I make my matcha in a medium sized bowl (chawan). I have been using Jade Leaf Organic Matcha. If anyone has another recommendation they love, I would love to try it as well! Please let me know in the comments below. I’m only using the culinary grade for now, because the ceremonial grades are so expensive in general.

I use 1/2 teaspoon matcha which I sift through a mini strainer. Then I add 1/2 cup hot water (don’t use boiling because the tea leaf is delicate) and whisk it until dissolved. I bought a Japanese whisk, but any whisk will do. Then I add the frothed milk to the tea.

macha-corner

I sprinkled some more matcha powder on for garnish for this photo 🙂

High Protein Matcha Latte

3/4 cup unsweetened coconut milk, soy milk, cow milk, or almond milk

1/2 scoop vanilla protein powder

1/2 teaspoon matcha powder

1/2 cup very hot water

  1. Mix coconut milk and protein powder together. Heat for 30 seconds in microwave. Stir. Heat for another 30 seconds. You don’t want to heat too long or the protein will curdle, which is really unpleasant! Froth milk using a whisk or mini frother.
  2. Sift matcha powder into a small bowl or coffee mug. Add hot water while whisking.
  3. Add milk to tea. Enjoy!

macha-close

Mmmmm….A nice cup of goodness!


Happy New Year, folks!

2017-melissa-iwai-animation

10 Comments

Filed under Beverages, Breakfast, Superfood

A Declaration in Support of Children

No recipe here, but I thought this was important to share!

faceofhope Illustration by Vanessa Brantley-Newton

Children’s literature may be the most influential literary genre of all. Picture books, chapter books, middle-grade and young-adult novels all serve the most noble of purposes: to satisfy the need for information, to entertain curious imaginations, to encourage critical thinking skills, to move and inspire. Within their pages, seeds of wisdom and possibility are sown.

Therefore we, the undersigned children’s book authors and illustrators, do publicly affirm our commitment to using our talents and varied forms of artistic expression to help eliminate the fear that takes root in the human heart amid lack of familiarity and understanding of others; the type of fear that feeds stereotypes, bitterness, racism and hatred; the type of fear that so often leads to tragic violence and senseless death.

Our country is deeply divided. The recent election is a clear indication of the bigotry that is entrenched in this nation, of…

View original post 841 more words

1 Comment

Filed under Uncategorized

Vegan Chocolate Coconut Almond Ice Cream

ice-cream-3

Recently, we discovered that our son has become lactose intolerant. This is not really a surprise, as I’ve had this condition since my early twenties and it runs in my family. Lactose intolerance isn’t the same as an allergy – we just don’t produce enough lactase, the enzyme which breaks down lactose found in milk. An easy way around it if we still want to eat things with milk and cream in it is to take a lactase pill at the same time.

Another way is to just substitute non-dairy items into our diet. I love coconut milk and almond milk and often drink that instead. And we both drink lactose free milk.

My son also loves the flavor of coffee and he really wanted to make a coffee flavored ice cream. We decided on mocha, since I didn’t want to go overboard with the coffee flavor — even decaf. And we both wanted to add almonds and chocolate chips, because – why not!?

I based this recipe on a vegan one from thekitchn.com and altered it. To flavor it, I used Trader Joe’s Sipping cocoa, but I’m sure other cocoas would work. This is a seasonal item that we always buy and stock up on in the winter. It has a wonderful chocolate flavor and is not too sweet.

The result is a delicious, dairy-free dessert which is not too sweet, but very creamy and rich. The chopped almonds and chocolate chip add another layer of crunchy texture. Next time we make it, we want to add mini marshmallows and make it a Mocha Rocky Road number!

ice-cream-2

Vegan Mocha Coconut Almond Ice Cream

2 14 oz. cans full fat coconut milk

1/4 cup agave syrup

3 tablespoons Trader Joe’s Sipping Cocoa or other cocoa mix

1 tablespoon unsweetened cocoa powder

1 tablespoon decaf instant coffee

2 tablespoons cornstarch

1 teaspoon vanilla extract

1/2 cup chopped roasted salted almonds

1/2 cup semi-sweet chocolate chips

  1. Shake the cans of coconut milk very well. Measure out 1/2 cup of the coconut milk and set aside.
  2. Heat the rest of the coconut milk, agave, instant coffee, and cocoas in a medium saucepan on the stove. Whisk constantly until completely dissolved, about 2 minutes.
  3. Add cornstarch to remaining coconut milk and whisk until fully incorporated. Add to saucepan and cook stirring constantly for about 6-8 minutes until mixture is thickened. It should to thick enough to coat the back of a spoon. Add vanilla extract.
  4. Remove from heat and transfer to a large bowl. Cover with saran wrap, pressing to surface of chocolate so that a skin doesn’t form. Chill over night.
  5. Churn mixture in an ice cream machine according to manufacturer’s directions until you have a soft ice cream texture. Stir in chopped almonds and chocolate chips.
  6. Transfer to a freezing container and freeze for several hours to harden and serve.

Makes about one pint

ice-cream-1


10 Comments

Filed under Children, Desserts

2 Ingredient Ice Cream Bread!

close up of ice cream cake2

This bread is a dream come true for our son. Yep, two ingredients: Ice Cream and Self-Rising flour. Mix them together and bake. How great is that? My son and husband made a vanilla loaf this afternoon, using Ben and Jerry’s Vanilla ice cream.

Verdict: Easy, tasty, and a great canvas for experimenting with different flavors!

Denis first saw the cake recipe here:

The “bread”, which has a great crumb but is not too sweet, reminds me of Japanese desserts. It would actually make a great base for this Strawberry Shortcake if you baked it in cake rounds and frosted it with whipped cream and layered with strawberries.

We are already devising plans for making it with Butter Pecan and Rocky Road ice creams.:)

ice cream bread2

2-Ingredient Ice Cream “Bread”

1 pint of ice cream (2 cups)

1 1/2 cups self-rising flour (or 1 1/2 cups flour plus 2 teaspoons baking powder and 1/2 teaspoon salt)

  1. Preheat oven to 350 F.
  2. Soften ice cream so that it is very soft. You can speed the process up by heating it in a microwave oven for 30 seconds.
  3. Transfer ice cream to a bowl. Then add the flour gradually to it while stirring.
  4. Grease a loaf or cake pan with butter or non-stick spray (we also cut a piece of parchment and lined the bottom of the pan)
  5. Bake for 30-50 minutes, checking after about 25 minutes. Length of time depends on the kind of pan you use. For a loaf pan, it took about 40 minutes until it was golden on top and a skewer came out clean when poked in the center.
  6. Cool in pan for 5 minutes, then cool on rack and serve!


7 Comments

Filed under Children, Desserts, Grains, Snack

Click Here to Start Launch and Power Button Start Cookies

  
This past week, we celebrated the release of my husband, Denis’, debut novel, Click Here to Start.

Click-Here-to-Start-High-Res
This awesome book cover was illustrated by Octavi Navarro.

The book chronicles twelve year old Ted, who is a whiz at Escape the Room Games, and his two friends, as they cleverly figure out what is behind the clues left by Ted’s great uncle – a WWII veteran of the Nisei Brigade from Hawaii. Ted is sure there is something valuable to be found in his late uncle’s apartment, and he has to use his gaming knowledge to do it. Along the way, the trio realizes there are other people searching for the same “treasure”, and they may not be so “friendly”. Ted and his friends have to use their wits and brains to solve the mystery – and ultimately, themselves, in this fact-paced, kid friendly novel.

The audio book, produced by Listening Library, was released at the same time, which was very exciting! It’s narrated by Greg Watanabe, an actor and comic. He does a wonderful job! I love how he’s able to do the different voices of all of the characters, whether they are male or female, young or old, from Hawaii or from the mainland… He gives each of them a distinct personality.

So far, the book has gotten such positive reviews from School Library Journal, Publisher’s Weekly, kidlit bloggers, teachers, librarians, kids. It was named a School Library Guild Section and an Amazon Best Books of the Month Selection.

“As addictive as your favorite video game. I couldn’t put it down.”-Adam Gidwitz, New York Times bestselling author of A Tale Dark and Grimm

“Humor, believable characters, and adventure…keeps readers in suspense to the end. A winner for mystery enthusiasts.”-Kirkus Reviews

“In this clever debut, Markell takes readers on a clue-filled adventure…[and] maintains an energetic, entertaining balance of character-driven narrative and tricky challenges.”-Publishers Weekly

“Markell’s highly entertaining debut novel…is a well-paced read with fully realized and likable characters,…[and] should have strong appeal to gamers, fans of video game-based stories, and reluctant readers.”-School Library Journal

And today from Jean Westmore of the Buffalo News:

“Markell offers plenty of scary suspense, thrilling action, references to literature and movies and lots of humor in his cleverly constructed puzzle. The book is dedicated to “the valiant men of the 100th Infantry Battalion and the 442nd Regimental Combat team, who fought so bravely for the U.S. at a time when their Japanese-American relatives back at home were being treated so dishonorably.’ His wife’s uncle was among them.”

click-cookies_Melissa-Iwai
For the Click Here to Start book launch at BookCourt this past weekend, I made Power Button Start Cookies. Jamie, our son, was a great help with frosting and packaging. He’s so proud of his dad! 🙂

jamie-_Click-Here-_-Bookcourt

me-icing_Click  

For the cookies, I used my tried and true sugar cookie and royal icing recipe I’ve used for holiday cookies in the past. This time, I used powdered egg white merengue for the frosting, and I think it really made a difference. The exterior piped frosting was perfectly hard. I am just not so great at piping! I dyed the frosting a bright green to match the Start button on the cover of the book. We frosted them green, then later, I piped the Start symbol on top in white. It is an extra step to do the piping and then the fill with diluted frosting, but the results are much better. You get a crisp outline and a very smooth interior with no ridges.

The event was wonderful. Fun to see old friends and new ones. Denis spoke about how he came to write the story, which is inspired by my uncle, Nicholas, Nakabayashi, who fought with the 100th Battalion during WWII. Denis also had fun playing Escape the Room Games with Jamie as research. 🙂

 Denis-and-Aubry-at-Book-COurt
I was surprised that almost all of my 38 cookies were eaten at the event! Only two remained, which we enjoyed after the big event. 🙂 


6 Comments

Filed under Art Related, Books, Cookies, Desserts, Uncategorized

Summer Fruit Tart

fruit-tart-Melsisa-Iwai-2016

Summer is here in Brooklyn, and in expensive, delicious fresh fruit is in abundance (unlike when I lived in California where this is the norm!) My cousin visited us recently, and I made a Summer Fruit Tart for the occasion. They were impressed, but it is a pretty simple dessert to make. The key for me is to do it in steps over a couple of days. I made the dough on Thursday, the pastry cream on Friday, and baked and assembled the tart on Saturday right before our guests arrived.

I’ve made mini fruit tarts in the past, which are fun to do with kids.
tartlets_flash

For this one, I just made one large crust and filled it with one batch of the pastry cream. For the fruit, I arranged cut strawberries, sliced oranges (I cut off the membranes), kiwi, and blueberries and glazed with thinned apricot jam. Below is the recipe I used with some adjustments.


tart-close-melissa-iwai-2016

Pastry Cream (Adapted from Jacques Torres’ Dessert Circus)

2 large eggs

2 large yolks

1/2 cup + 2 tablespoons sugar (4.5 oz.)

3 tablespoons flour (25 g)

2 tablespoons + 1 teaspoon cornstarch (25 g)

2 cups + 1 tablespoon milk

1/2 teaspoon vanilla extract

3 1/2 tablespoons butter

1.  Whisk eggs, yolks, sugar, flour, and cornstarch in a medium bowl until combined.  Make sure there are no lumps.

2.  Heat milk in a 2 quart heavy-bottomed saucepan over medium high heat.  Bring to a boil.

3.  Temper eggs.  Pour a little bit of the heated milk into the egg mixture while whisking constantly.  Then pour this mixture into the saucepan of milk.  Continuously whisk as it thickens.  After it comes to a boil, cook 2 minutes.  Remove from heat and stir in vanilla and butter.

4.  Transfer to a clean bowl and cover with saran wrap gently pressed on top of custard to prevent a skin from forming.  Refrigerate until ready to use.

Pate Sucre (Sweet Dough) (Adapted from Cook’s Illustrated)

1 large egg yolk

1 tablespoon heavy cream

1/2 teaspoon vanilla extract

1 cup flour (6 oz.)

1/3 cup confectioners’ sugar (1.5 oz)

1/4 teaspoon salt

6 tablespoons butter, chilled and cut into pieces

1.  Whisk together egg yolk, cream, and vanilla in a small bowl.  Set aside.  Pulse flour, sugar, and salt in the bowl of a food processor.  Scatter butter over the flour.  Pulse 15 times.  With machine running, add egg mixture through feed tube.  Process until dough comes together, about 25 seconds.  Shape into disk and wrap with saran.  Refrigerate at least 1 hour

2.  Let stand at room temperature until malleable.  Roll out about 1/4-inch thick.  Cut to fit tart pan.  Press in and prick bottoms with the tines of a fork.  Chill until ready to bake.

3.  Preheat oven to 375 degrees.  Fill tart with pie weights (or cover with a piece of aluminum foil sprayed with non-stick spray and fill with uncooked rice).  Bake about 15- 20 minutes.  Remove weights; bake 10-15 more minutes,  Watch closely – tarts should be golden — don’t let them brown too much.  Let cool on baking rack.  Using a sharp knife, remove shell to rack to cool completely.

Assemble Tart:

Glaze

1/3 cup jelly (I used apricot jam)

2 teaspoons water

1.  Heat jelly and water together.  Whisk.  Add more water if necessary to get a consistency of thin honey which you can easily brush on fruit with a pastry brush. If your preserves are lumpy, pass through a strainer.

2.  Cut fruit into slices.  Wash and dry berries.

3.  Fill tart shells with pastry cream.  Make a design on top using fruit.  Brush on jelly glaze with a pastry brush.


8 Comments

Filed under Desserts

Chocolate Hardware Tools and Book Signing in Brooklyn

Melissa Iwai 2016

Melissa Iwai 2016

Anne Rockwell, the author of Let’s Go to the Hardware Store, and I will be at BookCourt (163 Court St.) in Brooklyn tomorrow  (March 26) at 2 pm to read and sign books. I will also talk a bit about how I created the artwork for the story.

I also made a bunch of treats to bring to the event!

First up are dark chocolate and milk chocolate tools. I bought a cute tool mold here to make the candies. I melted chocolate pieces in a heat proof bowl in the microwave at 30 second intervals (about 1.5 to 2 minutes). Mixed well to get rid of any lumps and poured into the molds.

0325160633_resized

Getting the chocolate in the nooks and crannies takes a bit of time. You can nudge the chocolate with a spoon. Then, I wiped the edges clean with a damp paper towel and tapped the mold hard on the counter several times to get rid of any air bubbles. I found the dark chocolate to be easier to work with. Then I stuck it in the refrigerator to chill. The milk chocolate took longer to harden. Also, I discovered that the longer you let the chocolate chill, the easier it is to remove.

0324160713_resized

To do so, you just turn the mold over and gently press on the shapes. The chocolate should snap out in one piece.

Finished tools -- they are so shiny!

Finished tools — they are so shiny!

I wrapped the chocolates in foil, and then printed out my illustrations of tools from the book and affixed them to the wrapped chocolates.

0324160729_resized

For the toolbox, I made gingerbread. I used the same recipe I used for my Haunted Gingerbread House and Magna Tiles, but made one and half batches. I was inspired by this blogger’s cute tool box, but I made my own template, and I used a breadstick instead of a straw for the handle.

The trick is to roll the dough out on the baking sheet on parchment.

0324161044_resized

Then, using a template, score the dough gently with a knife. Bake for 15 minutes. While the dough is still warm, cut out the shapes. This ensures a sharp clean edge.

0324161205a_resized

Then I frosted the pieces using this recipe. I am not so great at frosting and made my flooding icing too thin. 😦 So my toolbox is not so pretty. But it holds my chocolates well. I made a divider out of card stock that is labelled “dark chocolate” and “milk chocolate” on each side so people can choose their favorites.

If you are in the Brooklyn area, please stop by and say “Hi” and grab a chocolate tool! 🙂

0325161813_resized


Chocolate Candies

1 bag chocolate pieces

  1. Pour 5 oz. of chocolate into a medium bowl.
  2. Heat at 30 second intervals in the microwave oven, checking the chocolate each time. You don’t want to overheat it. When it is smooth and silky when you stir it, stop heating. For dark chocolate it was about 90 seconds. For milk chocolate it was a little longer.
  3. Pour chocolate into candy molds. Be sure not to overfill. Nudge chocolate with a spoon or knife into nooks and crannies.
  4. Wipe around mold if you got chocolate in between shapes. Chocolate will come out easier if all the edges are clean. Tap mold hard several times on counter to remove air bubbles.
  5. Chill in refrigerator until firm, at least 30 minutes.
  6. To remove, turn mold over and gently press on the bottom. Chocolate should pop out easily.

6 Comments

Filed under Art Related, Children, Cookies, Desserts