Tag Archives: kids

DIY Terrariums

jamie's terrarium

I have a recipe today for you, but it’s not of the edible variety!  (sorry)  I wanted to share it with you all though, because it was loads of fun to create, and it makes a great project to do with the kiddos if you have them.

First off, the inspiration:

Lilla Roger’s Round one Global Talent Search (GTS) assignment — Create wall art related to terrariums with some text in the final piece. I just love her assignments.  They are very open ended yet structured enough to push me to create something I normally would never, ever create.  That’s why I decided to do it even though I never thought I would make it through to the next round.  You have to understand — the GTS is intense!  I had only read about it in blogs last year, and I would never have even entered had I not experienced the joy of the Bootcamp!  In the end, 999 people entered and only 50 made the cut! I didn’t, but it was a great experience.  A HUGE congratulations to the people who did make it though!  Looking forward to seeing what you came up with in the following round!  Go here to view their artwork  There are a lot of yummy pieces there!  But honestly, I saw SO many amazing, beautiful pieces in the private forum that I loved and thought for sure would make it that didn’t.  There is a lot of great art out there! It was so inspiring to see all the different creations and interpretations of the assignment.  Each one was truly unique.

When I began researching terrariums for my assignment, I was instantly fascinated by all the different types.  I love learning how things are made, and I found a number of sites that had tutorials.  We had some extra glass vases lying around, and I had just seen these adorable mini succulents in the plant store around the corner, so I thought:  We have to make some!

Jamie and I spent one sunny Saturday afternoon shopping for the ingredients (dad was off playing jazz piano with our friend who plays the bass guitar).  This is what we came back with:

ingredients

Actually, we had the glass vases and rocks at home.  We bought the mini succulents, cactus potting soil, and activated charcoal (from a pet store).  The charcoal is not required for a succulent terrarium — I’ve seen tutorials where it was included and where it wasn’t.  But we got it because it helps to drain the water, and keep smells to a minimum.  I didn’t want to take any chances with over watering our little plants.

Then we began layering:

soil and rocks

First we put rocks at the bottom, then some charcoal (it is the black bits in the photo above the white rocks), then some potting soil.

putting in rocks

Then we planted some plants and covered the soil with more rocks.  That’s it!  The whole thing took about 5 minutes.  Jamie added some Go Gos to inhabit the terrarium and keep guard.

jamie's terrariumI planted two more, and here is the trio (the little guy in the pot was too large to fit in a glass one!):

all three terrariums

It makes our window sill so much nicer!

plants on sill


Here is my final (painted) terrarium!  Since there was an elephant living inside, I decided to fill his space with lots of moist plants and give him a few friends to keep him company. 🙂

MELISSA_IWAI_GTS14A1_CULTIVATEJOY


DIY Terrarium (Open Air Succulent Type)

Some large mouthed vases or glasses

Rocks

Activated Charcoal

Potting soil for succulents

Succulent plants

Any mini figure or object you’d like for decoration

1.  Wash glasses and dry.

2.  Fill bottom inch with rocks.

3.  Add about another 1- 2 inches of charcoal

4.  Add potting soil.

5.  Plant succulents starting with the biggest first.

6.  Cover soil with rocks.

7.  Add mini objects if you’d like to live in the environment.


24 Comments

Filed under Art Related

Adventures with Jello

flubber jello


  Last month was all about Jello in the MATS Bootcamp.   I was really happy about it because anything that has to do with both food and art is excellent in my mind!  I drew a lot of Jello doodles.  Here are some: ink sketch   I also messed around with different art supplies and did some color experiments:

Painted in acrylic

Painted in acrylic

Drawings in pen over old palette paper

Drawings in pen over old palette paper

I really liked the effect of drawing on my old palette paper.  I will have to revisit that technique again in the future. Not sure how I will use it though. I had a lot of fun with all these doodles.  But when the actual assignment was unveiled,  I choked.  It was bolt fabric, and I still feel pretty insecure about pattern making because I am so new to it.  Here is my first attempt, which I hated: pattern 1 smaller I built all the icons in Illustrator.  The colors kind of clash.  Also there are too many items the same size.  I could have attempted another one using these icons, but I decided to trash it and start over.  I made another one that was more “me”.  Of course it had cute animals.  I’m obsessed with this bear and bunny and know there is a story there somewhere….  We also were introduced to a new “candy, nougat-y” palette.  

My pattern and what it would look like on an apron!

My pattern and what it would look like on an apron!

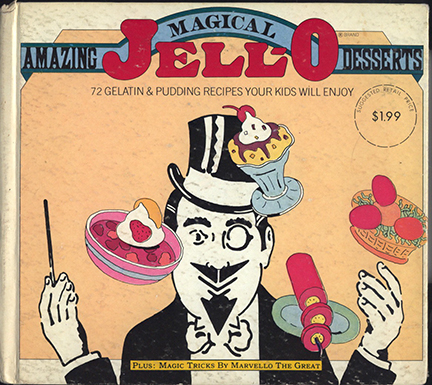
I loved this nougat palette so much, I decided to do an illustration I have been wanting to do for awhile using it.  The inspiration for this one was the February MATS assignment on cuckoo clocks.   I did this Bavarian couple experiment. bavarian couple This is the same couple in a candy nougat colored village.  This piece is completely different for me because of the palette, but I am really happy with it! bavarian couple_final3   With all this Jello activity, I was reminded of one of the very first cookbooks I got in the 70s or 80s — Amazing Magical Jell-O Desserts.  I love this book.  It is illustrated by the fantastic Seymour Chwast, and I was happy to see is still in print!

My original copy from my childhood

My original copy from my childhood — obvious from the price!

I thought it would be fun to make some Jello desserts with Jamie, so we spent an afternoon making three of them!  For one, we tried to make a big face on the bottom of the pan out of fruit.  Unfortunately, I don’t have a Jello-mold, so when we tried it with a pan and a candy mold, it was a big fail.The Jell-O wouldn’t come out.  😦 We made regular ones with fruit in parfait glasses and these worked out though:

Peach Jell_O with no sugar added fruit cocktail -- a classic

Peach Jell-O with no sugar added fruit cocktail — a classic!

We also made a Strawberry Poof one, but we didn’t have the correct amount of yogurt and I used sugar-free Jell-O (it was the only one that came in strawberry at the store).  This probably contributed to our second (semi) fail.  After chilling, the Jell-O totally had the consistency of Flubber!! flubber 2
I remember making this as a kid, and the consistency was more like a mousse– light and airy.  Oh well… we tried.  Also, we had a lot of fun.  🙂  We still ate it too, even though it was kind of weird.  It tasted good!

On another food/art front, the winners of the of the They Draw and Cook Glad Party were announced this week.  To see the 1st place winner and five second place winners, check it out here.  There were over 330 recipes submitted!! So I was honored to be one of the 15 Honorable Mentions!  My Amazing Tofu 3 Ways was voted “Most Awwwwwww-esome”, so that was pretty awesome. 🙂

 Peach Jello with Fruit

1 package of peach gelatin

1 can or about 8 oz. of fruit in natural juices

1.  Dissolve gelatin in 1 cup of boiling water in a large bowl and stir until completely dissolved.

2. Drain fruits, reserving liquid.  Measure 3/4 cup of it — if you need more liquid to make 3/4 cup, add water.  Add to gelatin.

3.  Pour some of the mixture into serving dishes about 1/4 full and chill for about 10 minutes to thicken.

4.  Add strained fruit to dishes and pour remaining gelatin mixture on top.  Chill until completely firm.


Strawberry Yogurt Poof (adapted from Amazing Magical Jello Desserts by Arnold Rosenberg)

1 package of strawberry gelatin  (don’t use sugar free!)

8 oz. of strawberry yogurt  ( be sure to use the full amount!)

1.  Dissolve gelatin in a large bowl with 1 cup of boiling water.  Stir until completely dissolved.  Add 3/4 cup cold water.  Chill for about ten minutes until slightly thickened.

2.  Add yogurt to jello and mix vigrously with a whisk or a hand mixer.  Transfer to serving dishes and chill.

25 Comments

Filed under Art Related, Children, Desserts, Uncategorized

Fun Holiday Activites for Kids and Green Beans with Bacon and Shallots

J painting

It’s the holiday season, and we’ve been doing a lot of baking and crafts to give as gifts.  J is doing a “Grab Bag” (like Secret Santa but minus the Christmas slant) in his class that I’ve been helping him with all week.  I will post later when it’s not a secret anymore!  I really proud of him because he came up with the concept entirely on his own and designed everything. I just helped him execute it, which involved a lot of cutting. I’ll leave it at that for now!

Another fun holiday craft we do is make cake decorations with fondant or gum paste.  The gum paste is a lot harder in texture and you can make very thin, solid objects with it.  You can make both at home and color as you wish, or you can buy them.

Last year, we made decorations for a dual faith cake with gingerbread men and a Christmas tree and Chanukah dreidls.

luster dust

The fun thing about the gum paste decorations is that you can paint them with a clear alcohol (it will evaporate as it dries and you only use a scant amount) and decorate with luster dust.

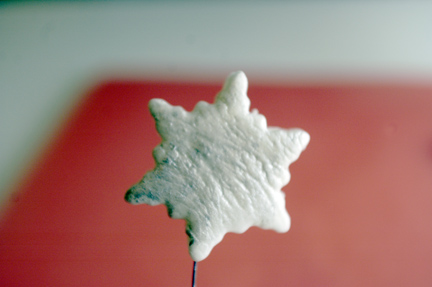
Gum paste snowflakes and angels with brushes, alcohol and luster dust

Gum paste snowflakes and angels with brushes, alcohol and luster dust

Last year I made this beautiful snowflake cake that was featured on Chef Dennis’ blog, and we decorated it with these shimmery gum paste snowflakes using leftover paste from the aforementioned dual faith cake.

My bad photography isn't quite capturing the beautiful shiny quality of the luster dust -- sorry!

My bad photography isn’t quite capturing the beautiful shiny quality of the luster dust — sorry!

We’re very much looking forward to spending Christmas with Denis’ family in Long Island like we do every year.  We usually bring a dessert, a side dish, and snack-y things to munch on.  We all hang out in the kitchen, talking, nibbling, and having a good time.  This year, we’re hoping to introduce everyone on our New York side to our FAVORITE family game which we play every year during Thanksgiving at my brother’s house in Illinois.  My nephew introduced it to us I think during his first year of college several years back, and it’s become a family tradition to play every Thanksgiving.  It is AWESOME!  The more people the better too!  Later we saw a ripped off version that was a board game in Barnes and Noble, but trust me people, it is better when you make it yourself.

What it is called:  Teledraw

What you need:  A group of people, a stack of small plain paper (like post-its), writing utensils.  So if you have seven people, you need seven stacks of seven pieces of paper. If you have twelve people, you need twelve stacks of twelve pieces and paper, and so forth.

Ages:  6-100! (When J was younger, he used to play as a partner to Denis who would do the writing– for kids doing this on their own, they just need to be able to read, write, and draw)

Basically, the game is like Telephone, but instead of whispering a sentence to the person next to you, you write a sentence.  Then pass it to the person next to you — and you get a sentence passed to you from the person on your other side.  Then for the next round, you draw a picture of whatever sentence was passed to you.  Then you pass this on, then you get another picture, and you write whatever you like the picture is showing.  It is hilarious how much your original sentence changes after a few rounds!  When you get your original stack back to you, the game is over, and you take turns reading it to everyone.  When we played at Thanksgiving, we were crying, laughing so hard!

My brother and mom cracking up

My brother and mom cracking up

I scanned my stack (minus the last sheet — sorry Nick!  It was a great drawing too!  Somehow it got lost in transit…  ) which had twelve panels — but showing eleven here.  I typed out the written segments so it would be easier to read here:

1.  (My sentence)  “I ate some cake.”

2.  Which my mother drew:

For some reason, my mom decided to make it like a "rebus"!

For some reason, my mom decided to make it like a “rebus”!

3.   My brother described this as:  “I see a little 3 year old running to a birthday cake.”

4.  Which my sister-in-law drew:

4

5. Denis then described:  “A smiling unshaven man watches as a child rushes toward a rocking chair-shaped menorah perched on a fireplace mantle. ”

6. Which my nephew’s friend drew:

6

7.  Which my nephew described as:  “A little boy says the blessings over the menorah during Chanukah as Sirium Black watches.”

8.  Which Jamie drew:

8

9.  Which my niece described as:  “Harry Potter is putting a wand to his head.  In another room, Ron Weasley is begging him not to.”

10.  Which her boyfriend drew as:

1011.  Which my other nephew’s girlfriend described as:  “A man stabbed his head with a stick but ended up running happily away.”

12. Then my nephew drew an amazingly detailed picture of man stabbing himself in the head and then running away with a smile on his face (lost in transit!)

So that is how “I ate cake” evolved into something slightly dark.  I love that the Harry Potter theme was continued for awhile!

Writing and drawing!

Writing and drawing!

So if you have to time and energy– play this game with your family over the holidays!  It is guaranteed to make you howl (in a good way)!

******************************************************************

To end with a recipe….

Here is a quick recipe for a side dish we love that would be a perfect side at your holiday table if you have bacon eaters.

green beans

Holiday Green Beans with Bacon and Shallots

1 lb. green beans (I buy the frozen ones at Trader Joes, because I am lazy!)

2 slices of smoked, thick sliced bacon, chopped into pieces

1/2 large shallot, diced

salt and pepper to taste

chopped parsley for festive garnish (optional)

1.  Steam green beans in steamer until cooked but crispy.  For frozen, this is about 8 minutes. For fresh, I think 6 minutes would work, but test a bean and see.

2.  Meanwhile, saute bacon in skillet.  When it is cooked, remove with a slotted spoon to a paper towel lined plate and let drain and crisp up.

3.  Add diced shallots to bacon fat in pan and saute until softened a bit, about 1 minute.  Then add steamed green beans and saute for about 2-3 minutes.  Add in reserved bacon and season with salt and pepper to taste.  Garnish if desired with chopped parsley.  Serve.

Wishing everyone a Happy Holiday Season!

Melissa Iwai 2012

Melissa Iwai 2012

10 Comments

Filed under Art Related, Desserts, Sides

Healthy Desserts for Kids

Chocolate, banana, spinach smoothie!

Awhile ago, during the summer (those days seem far away!), I had the opportunity to join Katherine Lee of about.com in her kitchen for a fun afternoon of cooking and filming!

Katherine has a wonderful parenting blog on about.com, and she invited me to contribute some healthy dessert ideas for kids.  We made everything in her kitchen and the lovely Meredith filmed us.  It was a blast and such a different experience from what I am usually doing during the day in my studio!  She treated us to a fabulous sushi lunch, and we munched on the desserts we made throughout the day.  🙂

My favorite Double Chocolate Zucchini, Banana Bread with Secret Ingredient is one of the recipes featured.

Can you guess what the secret ingredient is?

Check out the video on how to make it here.
Other super easy, practically-not-cooking recipes are:
Peanut Butter Truffles!  Remember this post?
Video is here.
Frozen Yogurt Grapes:
I never did a post about it, but the recipe is in the video.
Banana Soft Serve (minus the Magic Shell!):

All natural goodness — just bananas and a splash of milk!

Chocolate version seen here in the video.

And last, but not least:  Chocolate, Banana, Spinach Smoothie  

This the one video I never want Jamie to see, because he drinks this all the time!  It is a great after school snack.  The spinach has absolutely no flavor in the smoothie, and he has no idea I sneak it in. I sometimes use frozen spinach which adds to the creaminess of the smoothie along with the frozen banana!

Video and recipe are here.

Hope you enjoy these recipes — they are all really easy to make and are pretty healthy considering they are desserts!

27 Comments

Filed under Breakfast, Children, Desserts, Snack, Vegetarian

Individual Summer Fruit Crumbles

With vanilla ice cream–a perfect summer treat!

I’m right in the middle of finishing all the illustrations of my latest book project.  It will be published by Viking Press next year and is written by the amazing,  award winning Anne Rockwell.

I can’t show anything to you yet, but I can say that yummy breakfast food is a part of it. 🙂

Pancakes anyone?

Denis and I are also getting ready for the launch of our collaborative effort, Hush Little Monster, out next month.  More on that to come soon!

You would think with my workload I wouldn’t have time to make dessert on a daily basis.  But….

You would be wrong!

Here’s a  super easy and great summertime dessert that you can throw together without thinking.  The secret is to have a stash of topping already prepared.

Mix up a batch of crumble topping.  I use butter, brown sugar, granulated sugar, some flour or oats, spices and chopped nuts.  Sometimes I also add coconut.  I’ve even made a sugar free one for a friend out of just butter (you could use coconut oil also), almonds, cinnamon, and oats.

Store this crumble mixture in the refrigerator and use as needed.

Leftover crumble in container I keep in the fridge

When you want to have some dessert, cut up some fruit — summer is wonderful for stone fruits and berries which work well here.   Mix with a bit of sugar and other flavorings if you like, such as lemon juice, zest, liqueur– have fun.

Blueberries and chopped cherries mixed with a touch of sugar

Then fill ramekins.  We use about 1/2 cup of chopped fruit mixture per ramekin.

My assistant spooning fruit into ramekins

Top with however much crumble you want.

Putting on topping

Bake at 375 F degrees.   Since it’s been so hot, I just use our Cuisinart toaster oven, aka Easy Bake oven, because it preheats so fast and doesn’t heat up the apartment.  It only takes ten minutes to warm the fruit up and brown the crumble.

Unbaked crumble

Baked crumble – after ten minutes in toaster oven

You could also use a larger baking dish and make a big batch at once time, but you’d need to bake it longer– about 40-45 minutes and use a regular oven.

I like the little individual ramekins because they are portion controlled, heat up fast, and are small enough to fit in our above mentioned toaster oven.

Also, they are cute.

This is a sugar free, dairy free version: Just fruit, oats and sliced almonds!

My son loves making these crumbles.  Serve with whipped cream or ice cream and enjoy!

Warm, crunchy, and creamy!

Individual Summer Fruit Crumbles

½ cup chopped summer fruit and/or berries per ramekin

½ – 1 teaspoon sugar, depending on how sweet you like it – or none at all

dash of liqueur (such as Kirsch or Cointreau) or lemon juice or zest if you like

Crumble Topping – use however much you like (see recipe below)

  1. Preheat oven to 375 F degrees.
  2. Stir fruit and sugar (and liqueur, lemon juice, zest, if using) together.  Spoon into ramekins.
  3. Top with crumble.
  4. Bake for about 10-15 minutes until lightly browned on top.
  5. Serve immediately or cool to room temperature.

If you want to make one big crumble for 4-6 people, use about 2 ½ pounds fruit with ¼ cup sugar and stir together in a square baking pan or pie pan.  Top with crumble mixture.  Bake for about 40-45 minutes at 375 F degrees.

Crumble Topping:

6 tablespoons flour or oats or combination

¼ cup packed brown sugar

¼ cup granulated sugar

pinch of salt

cinnamon or nutmeg to taste

5 tablespoons butter, chilled, cut into pieces

¾ cup chopped nuts (I like sliced almonds)

Note:  you can also add in dried coconut, sunflower seeds, pumpkin seeds – use whatever strikes your fancy.

  1. Pulse flour, oats if using, with sugars and salt and spices in a food processor a couple times to mix together.  Add butter.  Pulse some more until mixture is sandy.  Then add nuts (and seeds and coconut if using) and pulse a few times more until mixture is clumpy.
  2. Store in a container in the refrigerator until ready to use.

28 Comments

Filed under Children, Desserts